
One of the challenges React solves is making unit tests relevant for user interfaces. Recently, we decided to migrate our tests to Jest (a testing framework also created by Facebook) to leverage this even more.
Jest was made to work particularly well with React and comes with exciting features which made us switch from our existing combo of Mocha and Chai. Read on to learn how we transitioned to React, and to learn more about Jest’s snapshot tests feature that got us feeling awesome.
Fewer moving parts, more fun
The transition between Mocha and Jest isn’t hard at all. Infact, depending on how complex your tests are, you might even be able to run your test directly using Jest. No joke.
But first, let’s talk about why we decided to move to Jest in the first place. The combo of Mocha and Chai works very well for vanilla JavaScript code used as data model, business logic, and utilities. But we also use JavaScript for UI components, and we want to be confident with this code as well. But it gets difficult to do all this with Mocha and Chai (Sinon and Enzyme and more give us the same headaches!).
Depending on its complexity, you may need many different packages that work together to test a React component properly. Jest is more integrated so you can go very far without any additional packages, and this seamless integration is exactly what makes the process so painless. With Mocha and Chai, even once all of the packages are installed and configured it’s quite hard to maintain the test suite. Have a look at this code sample of a React component test to see what I mean:
it('it should have an animal class', () => {
  expect(shallow(<Animal sound={testSound} />).find('div').first().props().className)
    .to.equal('animal');
});it('it should have an animal class', () => {
expect(shallow(<Animal sound={testSound} />)).toMatchSnapshot();
});I know right?! It’s almost shockingly easy! That’s the magic of Jest.
Faster, more reliable tests
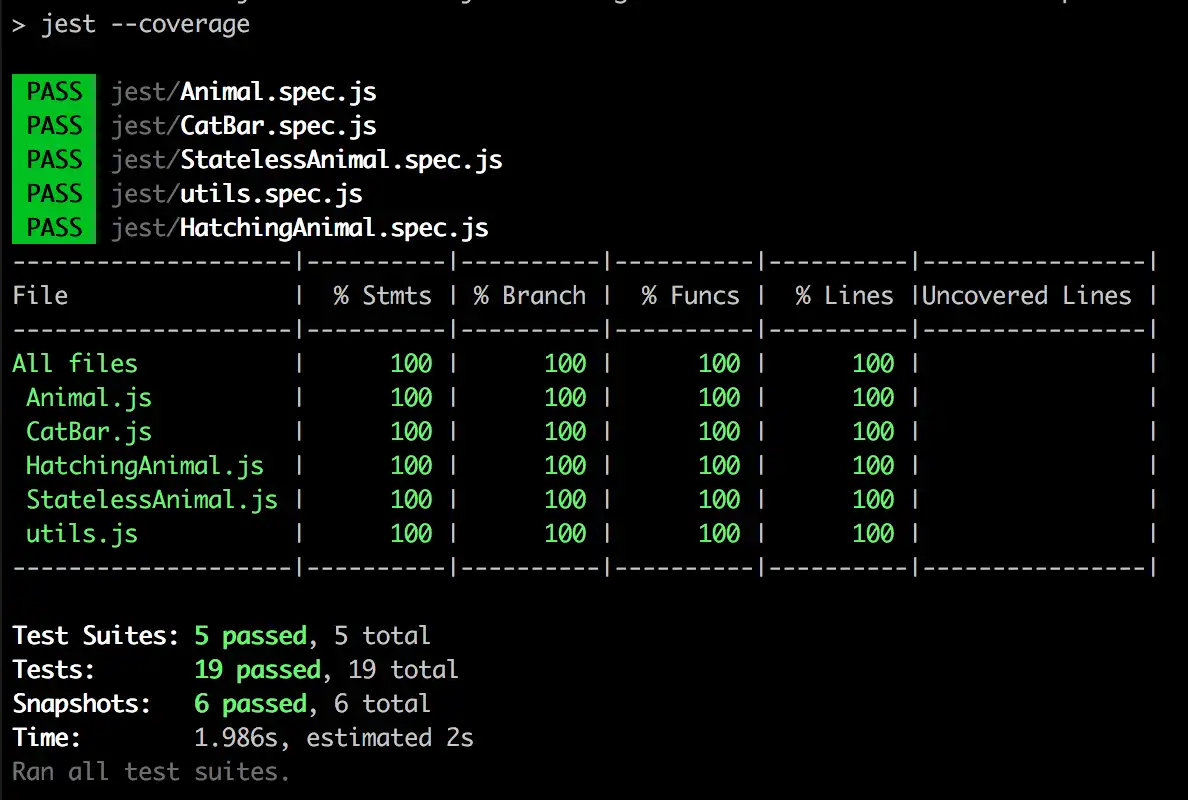
One of the advantages of Jest is speed. Jest runs tests in parallel which makes running the whole test suite so much faster. Also, you’ve got the possibility to use “--watch” and only run the tests affected by your changes in the editor. The coverage feature is impressive too. It gives you a nice and simple rendering directly in your console after you run the coverage command and standard LCOV reports.
Learn more about different Jest CLI options.
https://facebook.github.io/jest/docs/cli.html
The nitty gritty of the migration
All of the code samples in the following section are available as a GitHub repository: springload/mocha-chai-to-jest
Imports
Jest chooses to make all of the test utility functions (“describe” and “it” to structure test cases, as well as utilities to create spies and mocks) available in the global environment. So no need for imports!
Assertions
If you were originally using Chai’s “expect” syntax, you’ll feel at home with these assertions. There are small syntax differences though – Jest’s matchers are based on Jasmine’s.
For example: .to.be.true in Mocha/Chai becomes .toBeTruthy() in Jest.
The same goes for: .to.be.false -> .toBeFalsy()
The other tricky one is .to.be.equal(var). Using Jest, you have two options:
.toBe(var) which compares by reference (like a “===”).
.toEqual(var) which compares objects by value. This is ideal when you want to make sure all the object properties match.
There’s a list of all matchers on Jest’s great documentation to help you out.
Timers and mocks
With Mocha, the most popular way to stub or mock the environment is Sinon. With Jest, everything is already included! Boom. There’s no need to import yet another tool, and the tests get simpler to write. Let’s use a debounce utility function as an example: Take a look at this. We want to make sure it calls its callback. And this is the code you’ll end up with.
Voilà.
Fake timers are already implemented into Jest, so there’s no need for Sinon. Tell the test you’re going to use fake timers with jest.useFakeTimers(), then use jest.runOnlyPendingTimers(); to "fast forward" timers to their end.
Spies are implemented directly in Jest as well – sinon.spy() becomes jest.fn() and works the same way. This integration allows for useful additions to the matchers – the properties .called and .calledOnce on Sinon’s spy object are manageable directly with .toBeCalled() and .toHaveBeenCalledTimes().
Testing components
This might seem like the most “complicated” part, but your tests will look much lighter with the snapshot matcher. Here’s an idea of what it could look like, compared to the Jest version. As you can see it’s much easier to maintain the Jest tests thanks to the snapshots because we don’t rely on any label/text or structure for testing. While there are a few syntax differences, it makes component testing really easy and sustainable.
React testing with snapshots
TBH, the real reason we switched to Jest is its snapshot testing feature. It allows you to take a snapshot of your React component’s rendering – a representation of its output at a given point in time. Let's say we have a component called StatelessAnimal that requires a “sound” property. We want to create a snapshot of it that the component will be checked against each time we run the tests to make sure there are no regressions in the rendering of the component.
Jest will create a brand new snapshot of the component the first time you run the snapshot test. It's a readable file that looks like this:
exports[`StatelessAnimal component renders correctly with min params 1`] = `
<div
  className="animal">
  <p>
    Meow!
  </p>
</div>
`;
Notice how everything is split up into multiple lines? This is so the next time tests are run, Jest will compare the rendering of StatelessAnimal with the existing snapshot. The more lines, the cleaner the difference between the two snapshots and the easier it will be to understand why the tests failed. When intentionally modifying your component, the tests will break too, just as they would with Chai. But with Jest, you simply overwrite your snapshot using `jest -u` and that’s it! No more wasting time fixing your test suite anymore!
Jest has surprisingly changed our workflow. We have much more confidence in our core components and functions, and in our ability to create and maintain extensive test suites for our most pressing projects. With an automated test run on every code push and every deployment, we make sure that nothing should be broken once in production.
Want to learn more about how to leverage Jest and React to make UIs testable? We’re on a journey to rebuild our beloved Wagtail’s UI with React, and just started testing it with Jest snapshots. Follow our progress, and get in touch if you need front-end engineers to help you build an outstanding product (with the help of Jest, of course).
Get in touch
Let’s make the things that matter, better.
Email: hello@springload.co.nz
Phone: +64 4 801 8205